 Skip to content
Signpainting Techniques Using Gold Leaf
- by Sam Wozniak
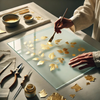
Incredible Sign Painting by @CactusSignPainting on Instagram using our Gold leaf!


Here’s a guide on how to achieve this work yourself:
How to Do Sign Painting Using Gold Leaf
Gold leaf sign painting, also known as gilded sign painting or glass gilding, is a time-honoured technique that involves applying thin sheets of gold to a surface—often glass, wood, or metal—to create luxurious, eye-catching lettering and designs. This method has been widely used for centuries in commercial signage, particularly for storefronts, pub windows, and high-end office signage.
Gold leaf signs are not only visually stunning but also durable and timeless, making them a preferred choice for businesses and artists who want an elegant and traditional look. Whether you are creating a window sign for a shop, a decorative plaque, or a gilded logo, mastering this craft requires patience, precision, and the right tools.
Materials Needed for Gold Leaf Sign Painting
Before starting, gather the following essential tools and materials:
- Gold Leaf Sheets (22ct–24ct) – High-quality gold leaf is recommended for a rich, long-lasting finish.
- Gilding Adhesive (Size) – This is a special glue that allows the gold leaf to adhere to the surface. Water-based size dries quickly and is best for indoor projects, while oil-based size takes longer to dry but is more durable for outdoor signage.
- Gilding Brush (Soft Mop Brush) – Used for handling and smoothing out the gold leaf.
- Gilder’s Cushion & Knife – Used to cut and handle delicate gold leaf sheets.
- Burnishing Tools (Cotton Balls, Agate Burnisher) – Used to smooth and polish the gold for a high-gloss finish.
- Backing Paint (Black Enamel or Shellac Varnish) – Protects the gold leaf and creates contrast.
- Stencil or Lettering Guide – Helps create precise letters and designs.
- Glass Cleaner & Razor Blade (For Glass Signs) – Used to clean and refine edges after gilding.
Step-by-Step Process for Gold Leaf Sign Painting
Step 1: Preparing the Surface
Before applying gold leaf, the surface—whether glass, wood, or metal—must be completely clean, smooth, and dry. Any dust, grease, or residue will interfere with adhesion.
For glass surfaces, use isopropyl alcohol or glass cleaner to remove any oils. If painting on wood or metal, sand the surface lightly and apply a primer or undercoat to ensure a smooth application.
Step 2: Designing and Outlining the Lettering
Use a stencil, hand-drawn guide, or pounce pattern to outline your lettering or design on the surface. A pounce pattern involves perforating a paper template with tiny holes and dusting chalk or graphite over it to transfer the design.
Alternatively, for freehand work, use a fine brush and water-based paint to lightly sketch out the letters.
Step 3: Applying the Adhesive (Size)
The next step is applying gilding adhesive, also called "size," to the areas where the gold leaf will be placed.
- Water-Based Size: Dries within 30–60 minutes and is best for indoor projects.
- Oil-Based Size: Takes 6–12 hours to reach the perfect tack and is preferred for outdoor signage due to its durability.
Apply the size thinly and evenly using a soft brush. The adhesive should be tacky, not wet before applying gold leaf—test it by touching it lightly with the back of your hand. If it feels sticky but doesn’t transfer, it's ready.
Step 4: Applying the Gold Leaf
Now comes the most delicate part—applying the gold leaf sheets to the adhesive.
- Carefully lift a sheet of gold leaf using a gilding brush or tweezers.
- Lay it gently over the tacky adhesive, allowing it to adhere naturally.
- Use a soft brush or cotton wool to press the leaf onto the surface and smooth it out.
- Continue applying overlapping sheets until the entire design is covered.
- Allow it to dry for at least a few hours before touching up.
Some areas may have gaps or missing pieces—these can be fixed by applying additional gold leaf in those areas.
Step 5: Burnishing and Cleaning Up
Once the gold leaf has set, gently burnish (polish) it to enhance its shine. Use a soft cotton cloth or an agate burnisher (if working on a smooth, hard surface) to gently rub the gold and create a reflective finish.
If working on glass signage, use a razor blade to carefully remove excess gold leaf outside the lettering lines. For wood or metal signs, a light buffing will remove loose flakes and refine the edges.
Step 6: Sealing and Backing the Gold Leaf
To protect the delicate gold from wear and oxidation, it is important to seal the design:
- For Glass Signs: Apply a coat of black backing paint or shellac over the gilded areas. This not only protects the gold but also creates contrast, making the lettering more visible.
- For Wood/Metal Signs: Apply a clear lacquer or varnish to seal and protect the gilding.
Allow the sealant to dry fully before handling the sign.
Expert Tips for a Professional Gold Leaf Sign
- Use High-Quality Gold Leaf: The higher the karat (24ct), the more durable and rich the final finish will be.
- Work in a Dust-Free Area: Gold leaf is extremely delicate and can easily stick to unwanted areas.
- Use Light Touches: Avoid touching gold leaf with bare hands, as it can stick and tear.
- Practice on a Scrap Surface First: If you’re new to gilding, test your technique before working on the final sign.
- Experiment with Antique Finishes: To achieve an aged, vintage look, lightly rub fine steel wool over the gold after burnishing.
The Timeless Appeal of Gold Leaf Sign Painting
Gold leaf signage is a classic art form that continues to be popular in modern businesses, luxury storefronts, and artistic projects. The rich, reflective quality of real gold gives signage a level of elegance and sophistication that cannot be replicated by metallic paints or digital printing.
While gold leaf sign painting requires patience and skill, the results are well worth the effort. Whether you’re creating a vintage-style pub sign, a high-end business logo, or a personalized decorative plaque, learning how to apply gold leaf will allow you to create stunning, long-lasting artwork that captures attention and admiration for years to come


